Marketing setup journey (part 2 of 3) - Extending Experience Profile
This blog is a follow up on part 1 of my marketing setup journey where I try to fulfill the following requirement:

This helper offers functionality to create or update a contact and its custom Facet.
With the above, we have all code in place to enrich a visitor’s experience profile.
So let’s go back to the use case.
A visitor enters your Sitecore site. Through the @Html.Sitecore().VisitorIdentification() that you place on your layout of each page, you ensure that for the user an object is created of type Contact (still anonymous though), and the visitor receives a cookie from which we can recognize him when he comes back to the site.
When the visitor is registering to your site using a registration form, after a successful account creation (in CRM or whatever system) we can start converting our anonymous contact to an identified contact by using the following code:
Use the contactId you get from your CRM, or the email address you got during registration (depending on what you want to and are allowed to use and store in xDB. Note that in xDB the contact will now have a Identifier object with the contactId set:

Now that this part is done you can use the following code to update contacts.
Start by creating a custom RuleContext:
With this rule now in code, and deployed to your site, you can define the rule inside Sitecore.

- Based on custom contact data (like age category, nr of acquired products etc.) enroll contact in engagement plans and send them automatic email campaign messages and track their progress on the site after opening the email.
I will explain and show in this piece what I did to extend my Sitecore eXperience Profile with custom data so that I can later on use that in engagement plans, personalization rules and A/B tests.
Extending your profile template
The default Sitecore experience profile contains data like:
- Firstname
- Lastname
- Gender
- Birthday
- Address etc.
Disclaimer: Keep in mind that you might not want to store sensitive data in xDB as frontend databases are not considered 'safe', so consider only saving metadata. So instead of saving someone’s account balance, email address or Age, save ‘IsRich’ or something even more ‘vague’, so that if data is captured it does not have too much meaning/value to the outside world.

To extend this profile with custom data, one should use so called facets. Facets, and the default experience profile data are stored in xDB, and it is structured as follows:

There is lots of information out there on facets, which I also used. Kudos to these blogs:
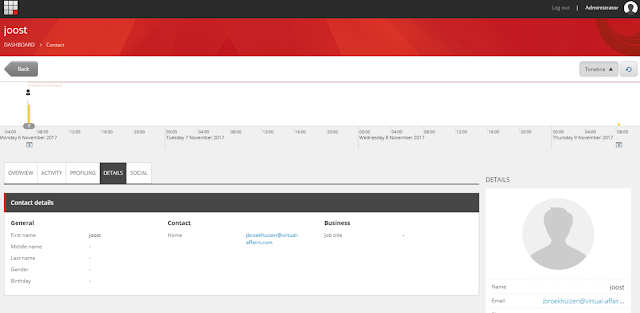
When you create a custom facet, it is created/stored by default at the same level as ‘Personal’, as you can see in this screenshot for custom facet ‘Contact Product Info’.
What may be good to note here, is that facets are only persisted when explicitly set on a contact. When a visitor is created in xDB and eventually identified as a contact, by default it will only have an ID, and only when you explicitly set the other facet values, will they be persisted.
A custom facet can be created by first defining an interface that inherits from IFacet, for the above usecase, my facet will contain three data properties and one contact identifier that will match my custom CRM personID:
NOTE: always consider whether to store data as a Facet or you can make due with metadata like Goals that have been triggered by the contact, which would relieve you from creating additional code like this
    public interface IContactProductInfo : IFacet
    {
        string ContactId { get; set; }
        bool FirstAssetAdded { get; set; }
        bool SecondAssetAdded { get; set; }
        bool HasSetGoalsForAssets { get; set; }
    }
After the interface you have to define its implementation:
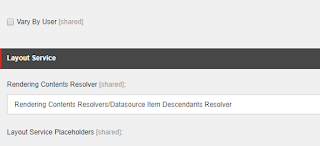
Finally, you have to make Sitecore aware of this custom Facet and that it is part of a contact’s experience profile. To do this you have to add a config setting, preferably in its own config file, which should be placed somewhere in the app_config\include folder:
Now that you have these customized Facets available, it is required to make some code to be able to access, add and modify them. To do this you can implement extension methods to the Contact object of Sitecore.Analytics.Tracking.Contact. Extensions can look like this:
What is important to note here is that the Contact object (from Sitecore.Analytics.Tracking) is an object that is read into session memory by Sitecore and does not contain explicit facet save functionality. So the way to deal with this custom data is to retrieve them as described above with the extensions, and then modify these facet references. On session end or when triggering an explicit save to xDB (to be described later), the entire contact is persisted again to the database. So there are no modify/add methods available, and not until the session is flushed or an explicit save of the contact to xDB has been performed, the data is not available to other processes.
Now that you have these Contact extensions all you need to actually start using them in your code, is access to the Contact object itself. One way to implement this is using a helper class which uses the ContactRepository and ContactManager which are available in the Sitecore.Analytics.Tracking namespace.
A (not really optimized) implementation could look like this:
    public class ContactProductInfo : Facet, IContactProductInfo
    {
        public const string FIELD_CONTACT_ID = "ContactId";
        public const string FIELD_FIRST_ASSET_ADDED = "FirstAssetAdded";
        public const string FIELD_SECOND_ASSET_ADDED = "SecondAssetAdded";
        public const string HAS_SET_GOALS_FOR_ASSETS = "HasSetGoalsForAssets";

        public ContactProductInfo()
        {
            base.EnsureAttribute(FIELD_CONTACT_ID);
            base.EnsureAttribute(FIELD_FIRST_ASSET_ADDED);
            base.EnsureAttribute(FIELD_SECOND_ASSET_ADDED);
            base.EnsureAttribute(HAS_SET_GOALS_FOR_ASSETS);
        }

        public string ContactId
        {
            get { return base.GetAttribute(FIELD_CONTACT_ID); }
            set { base.SetAttribute(FIELD_CONTACT_ID, value); }
        }

        public bool FirstAssetAdded
        {
            get { return base.GetAttribute(FIELD_FIRST_ASSET_ADDED); }
            set { base.SetAttribute(FIELD_FIRST_ASSET_ADDED, value); }
        }
        public bool SecondAssetAdded
        {
            get { return base.GetAttribute(FIELD_SECOND_ASSET_ADDED); }
            set { base.SetAttribute(FIELD_SECOND_ASSET_ADDED, value); }
        }

        public bool HasSetGoalsForAssets
        {
            get { return base.GetAttribute(HAS_SET_GOALS_FOR_ASSETS); }
            set { base.SetAttribute(HAS_SET_GOALS_FOR_ASSETS, value); }
        }
}
Finally, you have to make Sitecore aware of this custom Facet and that it is part of a contact’s experience profile. To do this you have to add a config setting, preferably in its own config file, which should be placed somewhere in the app_config\include folder:
<configuration xmlns:patch="http://www.sitecore.net/xmlconfig/">
  <sitecore>
    <model>
      <elements>
        <element interface="Website.IContactProductInfo, Website" implementation="Website.ContactProductInfo, Website" />
      </elements>
      <entities>
        <contact>
          <facets>
            <facet name="Contact Product Info" contract="Website.IContactProductInfo, Website" />
          </facets>
        </contact>
      </entities>
    </model>
  </sitecore>
</configuration>
    public static class ContactExtensions
    {
        public static IEmailAddress GetPreferredEmailAddress(this Contact contact)
        {
            var emailFacet = contact.GetFacet<IContactEmailAddresses>("Emails");
            if (emailFacet.IsEmpty) return null;

            var preferredEmail = emailFacet.Entries[emailFacet.Preferred];
            return preferredEmail.IsEmpty ? null : preferredEmail;
        }

        public static IContactProductInfo GetContactProductInfo(this Contact contact)
        {
            // THIS IS A CUSTOM FACET THAT I CREATED FOR DEMO PURPOSE
            var marketingFacet = contact.GetFacet<IContactProductInfo>("Contact Product Info");
            return marketingFacet;
        }

        public static IContactPersonalInfo GetPersonalProfile(this Contact contact)
        {
            var facet = contact.GetFacet<IContactPersonalInfo>("Personal");
            return facet;
        }

        public static IContactAddresses GetAddressProfile(this Contact contact)
        {
            var facet = contact.GetFacet<IContactAddresses>("Addresses");
            return facet;
        }

        public static IContactEmailAddresses GetEmailsProfile(this Contact contact)
        {
            var facet = contact.GetFacet<IContactEmailAddresses>("Emails");
            return facet;
        }

        public static IContactPhoneNumbers GetPhoneProfile(this Contact contact)
        {
            var facet = contact.GetFacet<IContactPhoneNumbers>("Phone Numbers");
            return facet;
        }
    }
What is important to note here is that the Contact object (from Sitecore.Analytics.Tracking) is an object that is read into session memory by Sitecore and does not contain explicit facet save functionality. So the way to deal with this custom data is to retrieve them as described above with the extensions, and then modify these facet references. On session end or when triggering an explicit save to xDB (to be described later), the entire contact is persisted again to the database. So there are no modify/add methods available, and not until the session is flushed or an explicit save of the contact to xDB has been performed, the data is not available to other processes.
Now that you have these Contact extensions all you need to actually start using them in your code, is access to the Contact object itself. One way to implement this is using a helper class which uses the ContactRepository and ContactManager which are available in the Sitecore.Analytics.Tracking namespace.
A (not really optimized) implementation could look like this:
   public class ContactHelper
    {
        private ContactManager _manager = Sitecore.Configuration.Factory.CreateObject("tracking/contactManager", true) as ContactManager;
        private ContactRepository _repository = Sitecore.Configuration.Factory.CreateObject("tracking/contactRepository", true) as ContactRepository;

        public ContactManager XdbContactManager
        {
            get { return _manager; }
        }

        public ContactRepository XdbContactRepository
        {
            get { return _repository; }
        }

        public void ModifyContact(string emailAddress, IContactProductInfo contactProductInfo)
        {
            //Above Method
            var currentContact = GetXdbContact(emailAddress);

            if (currentContact == null)
                return;

            ModifyContact(currentContact, contactProductInfo);
        }

        public void SaveContact(Contact contactToUpdate)
        {
            XdbContactManager.SaveAndReleaseContactToXdb(contactToUpdate);
        }

        public void ModifyContact(Guid contactId, IContactProductInfo contactProductInfo)
        {
            //Above Method
            var currentContact = GetXdbContact(contactId);

            if (currentContact == null)
                return;

            ModifyContact(currentContact, contactProductInfo);
        }

        private void ModifyContact(Contact currentContact, IContactProductInfo contactProductInfo)
        {
            var lockResult = XdbContactManager.TryLoadContact(currentContact.ContactId);

            Contact updatedContact = currentContact;
            updatedContact.Identifiers.Identifier = currentContact.ContactId.ToString();
            switch (lockResult.Status)
            {
                case LockAttemptStatus.Success:
                    var lockedContact = lockResult.Object;
                    lockedContact.ContactSaveMode = ContactSaveMode.AlwaysSave;
                    updatedContact = UpdateContact(updatedContact, contactProductInfo);  //this method should do work on lockedContact and return lockedContact.  this then saves it as updatedContact.
                    break;
                case LockAttemptStatus.NotFound:
                    updatedContact = currentContact;
                    break;
                default:
                    var exception = new Exception(GetType() + " Contact could not be locked - " + currentCon-tact.ContactId);
                    break;
            }

            //Save Contact Information - This is the ContactManager method to use
            XdbContactManager.SaveAndReleaseContactToXdb(updatedContact);
        }

        private Contact UpdateContact(Contact updatedContact, IContactProductInfo contactProductInfo)
        {
            updatedContact.GetContactProductInfo().SecondAssetAdded = contactProductInfo.SecondAssetAdded;
            updatedContact.GetContactProductInfo().FirstAssetAdded = contactProductInfo.FirstAssetAdded;
            updatedContact.GetContactProductInfo().HasSetGoalsForAssets = contactProductIn-fo.HasSetGoalsForAssets;
            return updatedContact;
        }

        private Contact UpdateContact(Contact lockedContact)
        {
            return lockedContact;
        }

        public Contact GetXdbContact(string identifier)
        {
            var contact = XdbContactRepository.LoadContactReadOnly(identifier);

            if (contact != null) return contact;

            return CreateContact(identifier);
        }

        public Contact GetXdbContact(Guid contactId)
        {
            var contact = XdbContactRepository.LoadContactReadOnly(contactId);

            if (contact != null) return contact;

            return null;
        }

        public Contact CreateContact(string identifier)
        {
            var leaseOwner = new LeaseOwner(GetType() + Guid.NewGuid().ToString(), LeaseOwn-erType.OutOfRequestWorker);

            var contact = XdbContactRepository.CreateContact(Guid.NewGuid());

            if (contact == null) return null;

            contact.Identifiers.Identifier = identifier;

            //Setting these values allows processing and aggregation to process this contact without erroring.
            contact.System.Value = 0;
            contact.System.VisitCount = 0;

            //MAKE OTHER Contact Changes here too if you need to on Create.

            XdbContactRepository.SaveContact(contact, new ContactSaveOptions(true, leaseOwner));

            return contact;
        }
    }
This helper offers functionality to create or update a contact and its custom Facet.
With the above, we have all code in place to enrich a visitor’s experience profile.
So let’s go back to the use case.
A visitor enters your Sitecore site. Through the @Html.Sitecore().VisitorIdentification() that you place on your layout of each page, you ensure that for the user an object is created of type Contact (still anonymous though), and the visitor receives a cookie from which we can recognize him when he comes back to the site.
When the visitor is registering to your site using a registration form, after a successful account creation (in CRM or whatever system) we can start converting our anonymous contact to an identified contact by using the following code:
Sitecore.Analytics.Tracker.Current.Session.Identify(contactId.ToString());

Now that this part is done you can use the following code to update contacts.
- When you are updating contacts out of a usercontext (so identified user that visits your site and triggers an event that needs to update his profile):
   var contact = Sitecore.Analytics.Tracker.Current.Session.Contact;


    var contactProductInfo = contact.GetContactProductInfo();
    contactProductInfo.FirstAssetAdded = true;
    contactProductInfo.SecondAssetAdded = true;
    ContactHelper helper = new ContactHelper();
    helper.ModifyContact(contact.ContactId, contactProductInfo)
Note that you don’t have to do the savecontact, this would also automatically happen on sessionend when the contact is flushed to the xDB, only do this if you need it persisted right away. Modifying the contact facets on its own is therefore enough.
- When you are updating contacts without usercontext, for example in a Sitecore scheduled command task, and you are executing a selection of contacts for which to update information, you would use following code:
    var contactProductInfo = contact.GetFacet<IContactProductInfo>();
    contactProductInfo.FirstAssetAdded = true;
    ContactHelper helper = new ContactHelper();
    helper.ModifyContact(contactId, contactProductInfo);
Hint: if you want to try out above code, create some mvc layouts where you trigger different scenarios of this code on, and create some page items based on these layouts. This allows you to easily try it out.
Using profile data
In the previous section was described how to get profile data into Sitecore xDB and how to save it. Now I had to enable a marketer to actually use this data inside Sitecore.
Preferably I also wanted to make it visual in the experience profile dashboard, but I would have to do that with Speak development. There is enough information out on the web to get you started there, but it is rather complex. It might be easier to create your own rendering for this and embed it somewhere. But this article will not cover that part.
What I will cover is creating rules/conditions that a marketer can use to evaluate values from our custom data in their personalization/engagementplans/a-b test etc.
Start by creating a custom RuleContext:
using Sitecore.Rules;
using Sitecore.Rules.Conditions;
using System;

    public class HasSecondAssetAddedBoolValue<T> : TrueCondition<T> where T : RuleContext
    {
        protected override bool Execute(T ruleContext)
        {
            try
            {
                var contact = Sitecore.Analytics.Tracker.Current.Contact;
                IContactProductInfo facet = contact.GetContactProductInfo(); // Get the facet

                return facet.SecondAssetAdded;
            }
            catch (Exception)
            {
                return false;
            }
        }
    }
With this rule now in code, and deployed to your site, you can define the rule inside Sitecore.
- Log into Sitecore
- Browse to the elements item (where rules definitions are defined) - /sitecore/system/Settings/Rules/Definitions/Elements/
- Insert a new Element Folder and call it Contact (or your customer project name)
- Under the element folder expand Tags and edit the Default item
- Select conditional renderings and engagement automation on the tags field - this allows the rule to be used when building page components for personalization and in engagement plans
- Save the item
- Under the Contact element folder, Insert a new Condition item and give it a name of your condition, like: HasSecondAssetAdded
- Set the text to "Where the user has custom facet SecondAssetAdded set to true". Usually this would be built up using operators and would appear a bit more advanced.
- Set the type to your class followed by DLL - ContactFacet.Rules.HasCustomFacetBoolValue, ContactFacet for example
- Make sure to publish your changes

Now with your rules in place you have enabled your marketer to start setting up engagement plans and email campaigns.
Wrap up
This concludes the second part of my journey on marketing setup. I have described how you can extend your Sitecore experience profile and how to use it from code and in Sitecore rules.
In the last part of this series I will describe how to use this and the email campaigns as described in part 1 of this series together in an engagement plan.
Online Casino Apps in India | Find a Bonus or Get Free
BeantwoordenVerwijderenExplore the best online casino apps kadangpintar for India. Here we will show you the current Indian casinos you can play 메리트카지노총판 on 인카지노 mobile. In our guide to the