Marketing setup journey (part 3 of 3) - Setting up engagement plans and bring it all together
This blog is a follow up on part 2 of my marketing setup journey where I try to fulfill the following requirement:
We start by setting up an Engagement plan that we are going to use to cover our scenario.

 Click on a rectangle of this condition to add another state if this rule is satisfied and name the state ‘AddAGoalMailSend’. This transition we will later alter to send an email.

And now you wait for the timeouts to expire and you receive your email!


- Based on custom contact data (like age category, nr of acquired products etc.) enroll contact in engagement plans and send them automatic email campaign messages and track their progress on the site after opening the email.
Create the plan
For this part we are going to configure the different parts in the Marketing Control Panel and Email Experience Manager, both accessible through the Sitecore dashboard. For this part it is recommended to use IE or Edge as these parts use Silverlight, and chrome for example does not play nice with this.We start by setting up an Engagement plan that we are going to use to cover our scenario.
- Go to your marketing control panel.
- Go to Goals and right click and choose insert Goal
- Name the goal, AssetGoalAdded, save your goal
- Go to Engagement Plans and right click, choose insert / Engagement Plan (or create a subfolder for categories first)
- Give it a sensible name like: AssetGoalsEngagementPlan
- Start Design
- Add a state and click it
- Edit it and give it namelike : UserHasAssets and display name: User has assets (Initial State)
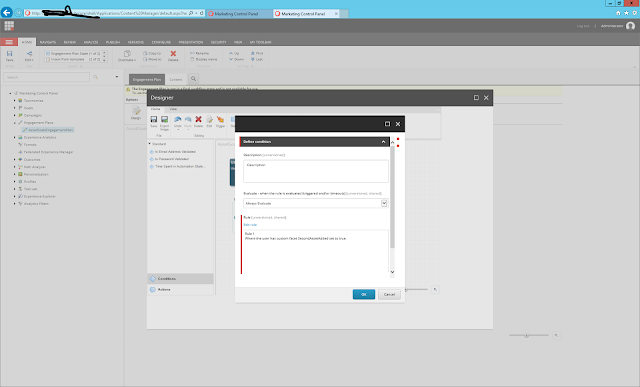
- Then edit its trigger, where we will define the conditions for a user to enroll into this engagement plan.
- You could also enroll a user to this engagement plan on page events (like a user visits a certain page or triggered goal or accessed site on campaign page), but in this example we will enroll the user in the engagement plan from code that could be triggered from a scheduled task (creation of command tasks is discussed later)
- Click the diamond icon on the state to create a condition. Edit the condition:
- Name it: User has two assets in his profile
- Select your custom rule for the custom facet value

- Now click a rectangle on the condition and create a second state and call it, UserHasAssets_WaitingForGoals
- Add another condition after this state and call it, NoGoalsAfter7Days
- Add rules for contact being in this state for 7 days (for debug purposes use 5 minutes instead)

 Click on a rectangle of this condition to add another state if this rule is satisfied and name the state ‘AddAGoalMailSend’. This transition we will later alter to send an email.
- Add another state and name it UserHasAddedGoals, and set its trigger to the goal you created earlier ‘AssetGoalAdded’
- For each state, click the arrow in bottom right of the rectangle, and set timeout for evaluation to 1 minute for debug purposes.
This plan should behave as follows: When user is enrolled in engagement plan he is set to initial state. If the user has his profile enriched with custom facet ‘SecondAssetAdded’ with value true, the contact should automatically move to the next state in the engagement plan. If after 7 days he is still in the second state he will move to the AddAGoalMailSend and an email will be triggered to engage the user. If the user sets a goal (before or after the email), we should trigger setting goal ‘AssetGoalAdded’ for the contact and he will move to the final state in this engagement plan.
Your plan should look something like this:

- Save your engagement plan and exit the designer.
- Go to review tab of your ribbon and choose ‘Deploy’, ok
- Publish your plan
Hint: to try this engagement plan out, put below code on some custom mvc layouts, and create sample page items to trigger this code and see its effects in the experience profile/activity pages. Also the ‘monitor’ option on your engagement plan should show you the amount and which visitors/contacts are in which state.
To enroll a user in your engagement plan and get him in its first state. Use following code (alternative is a campaign that automatically enrolls you in this engagement plan, and create a page item for which you configure this campaign):
@using System.Linq;
@using Sitecore.Analytics;
@using Sitecore.Analytics.Automation.Data;
@using Sitecore.Analytics.Automation.MarketingAutomation;
@using Sitecore.Data.Items;

@{
    var contactId = HttpContext.Current.Request.QueryString["cId"]; //or get it from your crm or whatever

    Tracker.Current.Session.Identify(contactId);
    var managerInContext = Tracker.Current.Session.CreateAutomationStateManager();
    managerInContext.EnrollInEngagementPlan(new Sitecore.Data.ID("97288A03-81AF-4145-886D-142FA40415E0"), new Sitecore.Data.ID("6139C9FF-3316-46CF-9B55-9AECAB800143"));
}
You can get the ID’s of your engagement plan and initial state by browsing to them in your marketing panel, and view their quick info. Of course, eventually you want to make this a bit more flexible, and maybe make the state and plan configurable in some Sitecore config items, configure them to be linked to specific page items or campaign etc.
Trigger from any process the following code to move the contact to the second state:
Trigger from any process the following code to move the contact to the second state:
    var contact = Sitecore.Analytics.Tracker.Current.Session.Contact;


    var contactProductInfo = contact.GetContactProductInfo();
    contactProductInfo.FirstAssetAdded = true;
    contactProductInfo.SecondAssetAdded = true;
    ContactHelper helper = new ContactHelper();
    helper.ModifyContact(contact.ContactId, contactProductInfo);
or if not from website/user context:

    var contactId = “”; //set from wherever to your crm id
    var contactProductInfo =new ContactProductInfo();
    contactProductInfo.FirstAssetAdded = true;
    contactProductInfo.SecondAssetAdded = true;
    ContactHelper helper = new ContactHelper();
    helper.ModifyContact(contactId, contactProductInfo);
And now you wait for the timeouts to expire and you receive your email!
Test your plans!
To test what has been created, make some pages and actions that trigger the different pieces of code in the right order and check your Experience profile dashboard after each step:
- Incoming anonymous visitor
- NOTE: to see anonymous visitors in your experience profile dashboard, you need to enable: ContentSearch.Analytics.IndexAnonymousContacts setting in your Sitecore.ContentSearch.Analytics.config
- Identified contact (profile has id and email address or person id)


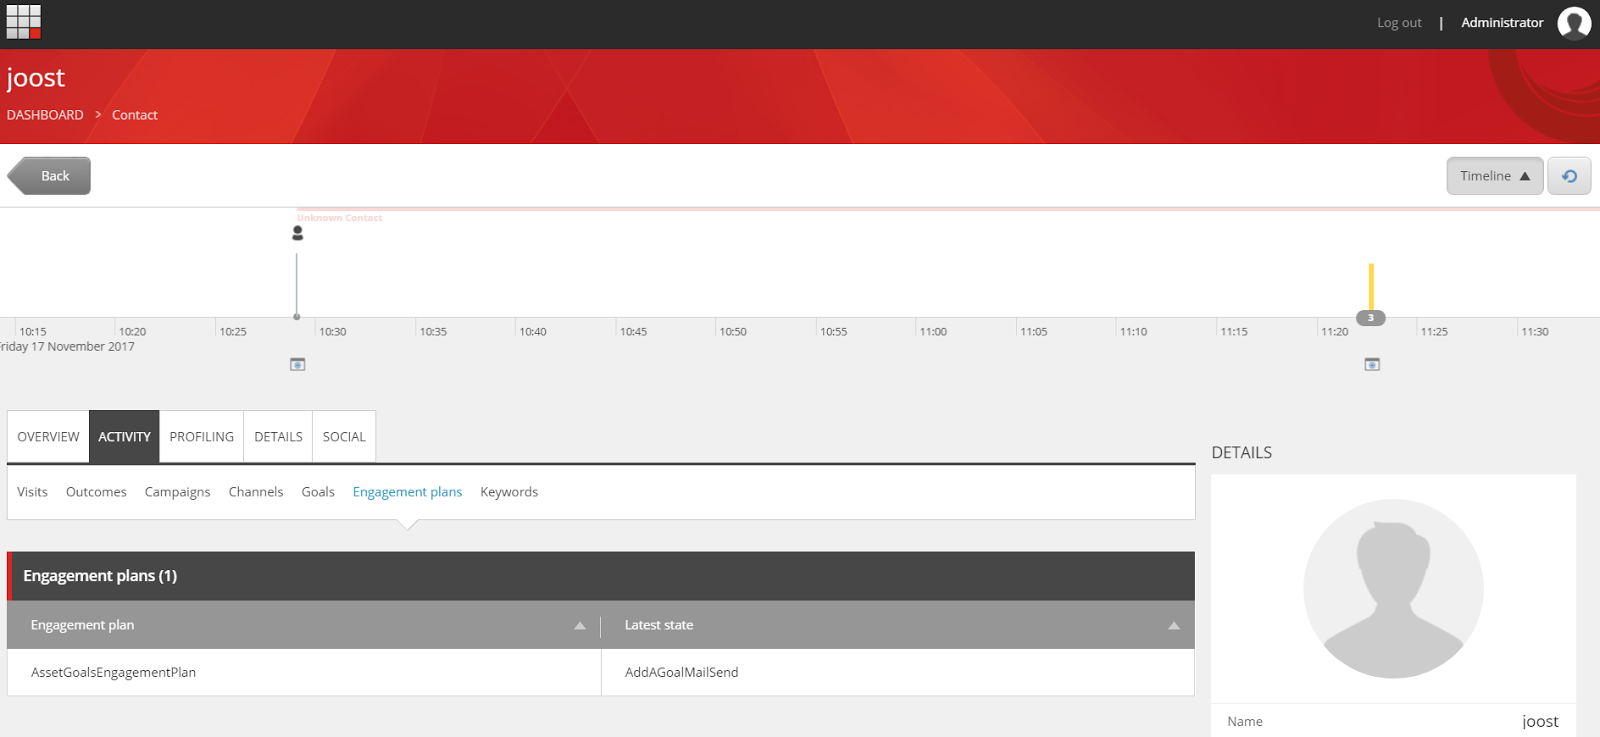
- Contact is enrolled in a plan, check profile activity and engagement plans he is enrolled in

- Trigger state change by updating contact profile with custom facet data, check your profile activity again for new state in engagement plans

- Wait for email to be received by contact and open email, click a link in it


- Go to Email Experience Manager dashboard and open your automated email campaign and check the activity results there


Considerations
This journey has showed me a lot of the power you can enable your marketer with in the Sitecore platform. Great power comes with great responsibility though and with this described scenario I came to the conclusion that while this approach is technically possible, there might be many performance and security concerns. So please take the following into consideration when creating your own implementation where you want to combine CRM/Backend data into your rules:
- Are there alternative ways of enrolling users in engagement plans based on custom data (think of making selections of user from a BI database and enrolling this group in a seperate process)
- Do you need the custom data in your reporting, or do you only need a segmentation of contact groups where you can then create reports on
Reacties
Een reactie posten